At its most basic, the hardware for this project is minimal - a readily-available serial bluetooth module such as the HC-06:
Strictly speaking, it's only the daughter board on these typical "modules" that's required - the carrier module is just providing some interfacing and voltage regulation. Even though these daughter boards require 3.3V power, the Zoom Remote doesn't seem able to supply enough current to operate them, so our minimum viable product would consist of an HC-06, a cable to connect it to the recorder, another cable (such as a USB cable) to connect it to an additional source of power - and a case.
According to the documentation, the H2n can't operate as an audio recorder from USB power - and, indeed, if you plug the USB port into a USB host device, such as a computer, it will switch modes to become either a USB mass storage device or a USB audio interface rather than an audio recorder. However, it transpires that if you connect it to a powerbank it doesn't swap modes and continues to function as an audio recorder, powered from the USB port. You can even remove the batteries, but the time and date will be lost when you remove the USB power if you do.
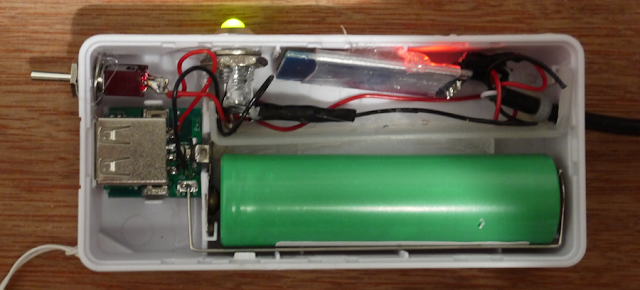
As I had a cheap powerbank case lying around, I thought it might serve double duty as a container for the bluetooth module and as an additional source of power for the recorder. This type of case is widely to be found on eBay and is designed to hold two Li-ion 18650 rechargeable batteries:
The batteries are simply connected in parallel, so the unit will function with just one in situ. The case is provided with a controller board to correctly charge the battery when the input power (micro USB) is connected and to limit the discharge of the battery when output power is being supplied (via the regular USB connector). We can take the 5V we need to power the bluetooth module from the output USB connector as shown and there is plenty of space where the second battery would be to fit the bluetooth module.
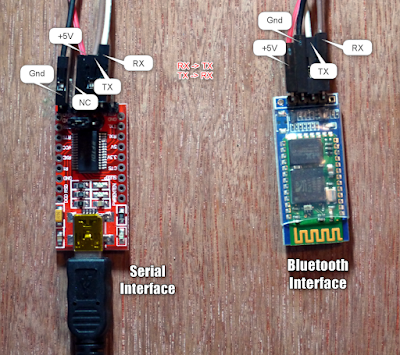
However, we first need to set up the bluetooth module to have the correct operating parameters. In order to do this, we need a serial interface for our computer that operates at the 3.3V levels required by the HC-06. The easiest is to get a module with a USB interface for the computer and some wiring pins to hook it up to the bluetooth board. If you search for "FTDI USB to TTL" or "YP-05", you'll find lots of modules, some genuine, some not, that will fit the bill. Here's the one I got:
The microUSB cable connects to the computer where it should automatically be detected as a serial interface. Power is connected from the serial board to the bluetooth board and the TX and RX lines are connected in a crossover fashion - TX from one board goes to RX on the other.
Although you can configure the bluetooth interface simply with AT-style modem commands, it's much easier to use this utility which is available for Windows, Linux and Mac.
First, confirm that the computer has detected the USB serial port by using the "--detect-ports" option:
$ hc04conf --detect-ports
Port	Description	Hardware
====	===========	========
/dev/ttyS0	ttyS0	n/a
/dev/ttyS1	ttyS1	n/a
[...]
/dev/ttyUSB0	FTDI FT232R USB UART A50285BI	USB VID:PID=0403:6001 SNR=A50285BI
You can then check if the bluetooth device can be found on the appropriate port:
$ hc04conf --port /dev/ttyUSB0
No baud rate given. Autodetecting... 2400
Version: linvorV1.8
The configuration utility has detected the firmware version of the bluetooth board. Now configure the board as we require - choose any name for the device that you want:
$ hc04conf --port /dev/ttyUSB0 --set-baud 2400 --set-name Zoom-H2n
No baud rate given. Autodetecting... 2400
Version: linvorV1.8
Setting name... done.
Setting baud rate... done.
The serial module can now be set aside - the bluetooth module will remember its configuration.
Having configured the device, it's simply a matter of construction. The first thing to do is to remove the unnecessary battery connectors. The electronics of the powerbank are easily unclipped from the plasic case:
Wireclippers can be used to remove the uppermost positive and negative battery connectors. Power leads can be soldered to the uppermost (+ve) and lowermost (-ve) of the 4 USB connector pins and these connect to a switch, an LED (with a 150R series resistor) and the HC-06 module. The easiest way to effect the connection to the Zoom H2n is to buy a ready made TRRS cable and simply cut off the unwanted connector. Use a continuity tester to establish the wiring. Then connect the appropriate wires to the HC-06 as follows:
- Tip: RX
- Next Ring: TX
- Next Ring: Ground
I cut a piece of plastic from an old box to serve as a divider inside the case and keep the electronics clear of the battery.
Hot-melt glue holds everything in place and a cable tie prevents the TRRS cable being pulled free. I also partially drilled a hole in the case adjacent to the HC-06 's surface mount LED so that the connection status can be seen:
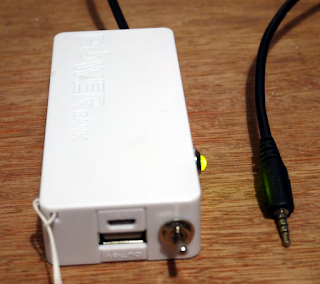
With the lid in place, the construction is complete:
A further article will describe the software in more detail. However, you have to manually pair your phone with the bluetooth module in the bluetooth settings of your phone - the software will only allow you to work with a previously-paired device.
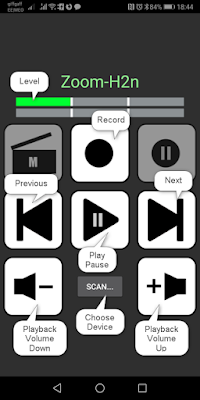
When you first load the Android app, you will see the following screen:
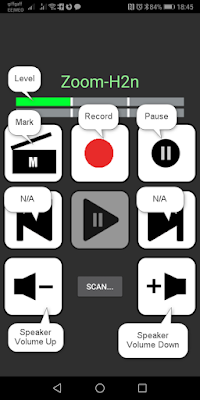
Use the "scan" button to select the paired device that you want to use - the software will only offer paired devices that have the correct serial profile. The buttons are greyed out because there is no connection. Once a device is selected, the software will attempt to connect to the bluetooth module. When it's successful, the LED on the bluetooth module will turn on permanently, the "No Device Selected" message in the app will change to the name of the selected device and will turn yellow as the software tries to communicate with the H2n. Assuming success, the screen will change as follows, with the available buttons being activated:
If you choose "record", different buttons are available:
Note that the H2n has no provision to adjust the recording level from a remote control, but the level indicators at the top of the screen will indicate green, green+amber or green+amber+red as a crude form of VU meter. Depending on which inputs you use one or both level indicators may be active.
Here's a brief video of the remote control in operation:





Comments
Post a Comment